There’s something magical about s’mores that instantly takes me back to summer nights by the campfire. But let’s be honest: the smoke, the fire-tending, and the sticky fingers aren’t always ideal. The first time I tried baking these Layered S’mores Bars indoors, it felt like unlocking a cheat code for all the flavor and none of the fuss. These bars are the perfect beginner dessert—simple, quick, and guaranteed to impress. Plus, they offer all the cozy, nostalgic flavors of classic s’mores without needing a flame.
If you’re just starting your baking journey, this Smores Bars Layered Dessert Recipe is ideal. It requires minimal equipment, basic pantry ingredients, and offers a generous margin for error. Even better, it’s a quick and healthy meal option when you need a comforting, homemade sweet without spending hours in the kitchen.

Why This Recipe is Special
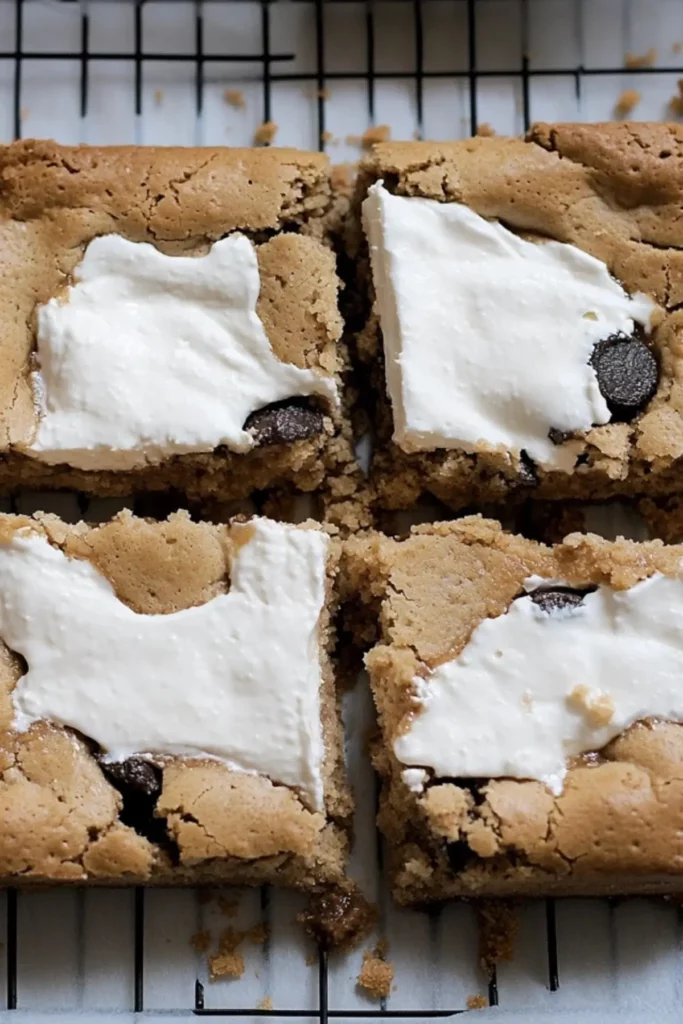
What makes these Layered S’mores Bars stand out is their brilliant construction. A soft graham cracker crust acts as a base, topped with a fluffy marshmallow layer and rich chocolate chips, then finished with a rustic patchwork crust on top. The layering ensures that every bite is perfectly balanced between crunchy, gooey, and chocolatey. It’s the ultimate treat for parties, potlucks, or simply upgrading your weeknight dessert game.
Ingredients and Preparation
Unsalted Butter
Provides a rich, creamy base for the crust and helps create a tender, melt-in-your-mouth texture.
Brown Sugar
Adds sweetness with a hint of molasses flavor, giving the crust a slight chew and depth.
Egg
Acts as a binder, holding the dough together and adding moisture.
Vanilla Extract
Enhances the sweetness and ties together the graham cracker and chocolate flavors.
Graham Cracker Crumbs
Deliver that signature s’mores flavor and a subtle crunch.
All-Purpose Flour
Forms the structure of the dough, making it sturdy enough to layer and slice.
Baking Powder
Gives a little lift to the crust layers so they’re soft rather than dense.
Salt
Balances the sweetness and enhances all the other flavors.
Marshmallow Creme
Replaces the traditional toasted marshmallow, bringing smoothness and a perfectly gooey texture.
Chocolate Chips
Create pockets of melted, rich chocolate throughout every bite.
Ingredient Alternatives
- Swap brown sugar with coconut sugar for a more caramel-like flavor.
- Use crushed digestive biscuits instead of graham crackers if you’re outside the U.S.
- Try semi-sweet, milk, or dark chocolate chips depending on your sweetness preference.
- For a dairy-free version, use vegan butter and dairy-free chocolate chips.
Step-by-Step Instructions
Step 1 Preheat your oven to 350°F (175°C) and grease an 8×8-inch baking pan with butter or non-stick spray.
Step 2 In a mixing bowl, cream together the softened butter and brown sugar until light and fluffy. This step helps build a tender, buttery crust.
Step 3 Beat in the egg and vanilla extract until fully incorporated. Make sure the mixture looks smooth and slightly glossy.
Step 4 In a separate bowl, whisk together the flour, graham cracker crumbs, baking powder, and salt to evenly distribute the dry ingredients.
Step 5 Gradually add the dry mixture into the wet ingredients, mixing slowly until a soft dough forms. Don’t overmix; just stir until combined.
Step 6 Divide the dough into two equal portions. Press one half firmly into the bottom of your prepared pan, making sure it’s even all around.
Step 7 Using a greased spatula (or the back of a spoon), spread the marshmallow creme over the crust. Be patient—it’s sticky, but a light hand and a little cooking spray on the spatula help.
Step 8 Sprinkle the chocolate chips evenly across the marshmallow layer. Ensure good coverage so every bite gets a taste of chocolate.
Step 9 For the top layer, flatten small balls of the remaining dough between your palms and lay them across the top like a patchwork quilt. It’s fine if some marshmallow or chocolate peeks through.
Step 10 Bake in the preheated oven for 25–30 minutes or until the top is golden brown and the edges are set. Cool completely before slicing to get clean bars.
Beginner Tips and Notes
- If the marshmallow creme is too sticky, dip your spatula in warm water or lightly grease it with oil to spread more easily.
- If the top browns too quickly, lightly tent the pan with foil halfway through baking.
- Prep Like a Pro: Measure all your ingredients before you start mixing to keep things moving smoothly.
- Tool Substitutes: No electric mixer? A sturdy whisk and some elbow grease will do the trick.
Serving Suggestions
Pair these Layered S’mores Bars with a scoop of vanilla ice cream or a drizzle of chocolate sauce for an even more decadent treat. They also make an excellent addition to a party dessert table alongside fresh fruit and nuts for contrast.
Storage Tips
Store leftover bars in an airtight container at room temperature for up to three days. For longer storage, refrigerate them, but let them come to room temperature before serving for the best texture.
Conclusion
There’s no better way to enjoy the flavors of campfire s’mores than these easy, no-fuss Layered S’mores Bars. Whether you’re baking for the first time or simply need a quick, crowd-pleasing dessert, this recipe is a winner. I’d love to hear how yours turn out—leave a comment below and share your baking adventure!
FAQ About Smores Bars Layered Dessert Recipe
Q1: Can I use mini marshmallows instead of marshmallow creme?
Yes, you can use mini marshmallows if that’s what you have on hand. Just layer them evenly over the crust, but be aware they may brown more quickly, so keep an eye on the oven during baking.
Q2: How do I keep the bars from falling apart when slicing?
Let the bars cool completely in the pan before slicing. Cooling allows the marshmallow and chocolate to firm up, making it easier to cut clean squares.
Q3: Can I double this recipe for a larger crowd?
Absolutely. Just double all ingredients and use a 9×13-inch pan. The baking time may need to increase slightly—start checking around 30–35 minutes.
More Relevant Recipes
Print
Smores Bars Layered Dessert Recipe
- Total Time: 40 minutes
- Yield: 9–12 bars 1x
- Diet: Vegetarian
Description
These Layered S’mores Bars are an easy sheet pan dessert made with a graham cracker crust, gooey marshmallow creme, and melted chocolate chips—perfect for beginner bakers.
Ingredients
- 3/4 cup brown sugar
- 1/2 cup unsalted butter, softened
- 1 egg
- 1 tsp vanilla extract
- 1 cup graham cracker crumbs
- 1 1/4 cup all-purpose flour
- 1 tsp baking powder
- 1/2 tsp salt
- 1 jar marshmallow creme
- 1 cup chocolate chips
Instructions
- Preheat oven to 350°F (175°C) and grease an 8×8-inch baking pan.
- In a mixing bowl, cream together softened butter and brown sugar until fluffy.
- Beat in egg and vanilla extract until fully combined.
- In a separate bowl, whisk together flour, graham cracker crumbs, baking powder, and salt.
- Gradually add the dry mixture to the wet ingredients, mixing until a soft dough forms.
- Divide the dough into two equal parts. Press one half into the bottom of the prepared pan.
- Spread the marshmallow creme evenly over the base using a greased spatula.
- Sprinkle the chocolate chips evenly over the marshmallow layer.
- Flatten small portions of the remaining dough and place them patchwork-style over the top.
- Bake for 25–30 minutes or until golden brown. Let cool completely before slicing.
Notes
- Let bars cool fully before cutting to help them hold shape.
- Use cooking spray on your spatula to make spreading marshmallow creme easier.
- Cover with foil during baking if the top begins to brown too quickly.
- Store at room temperature for 3 days or refrigerate for longer shelf life.
- Prep Time: 10 minutes
- Cook Time: 30 minutes
- Category: Dessert
- Method: Baking
- Cuisine: American
Nutrition
- Serving Size: 1 bar
- Calories: 280
- Sugar: 22g
- Sodium: 140mg
- Fat: 14g
- Saturated Fat: 8g
- Unsaturated Fat: 5g
- Trans Fat: 0g
- Carbohydrates: 35g
- Fiber: 1g
- Protein: 2g
- Cholesterol: 35mg