There’s something deeply nostalgic about the smell of fresh bread wafting through the kitchen on a quiet morning. My earliest memory of this Hainanese bread loaf is watching my grandmother flip thick, golden slices over a charcoal grill, then spreading them with a generous layer of kaya jam and a slab of butter. It wasn’t just breakfast—it was tradition.
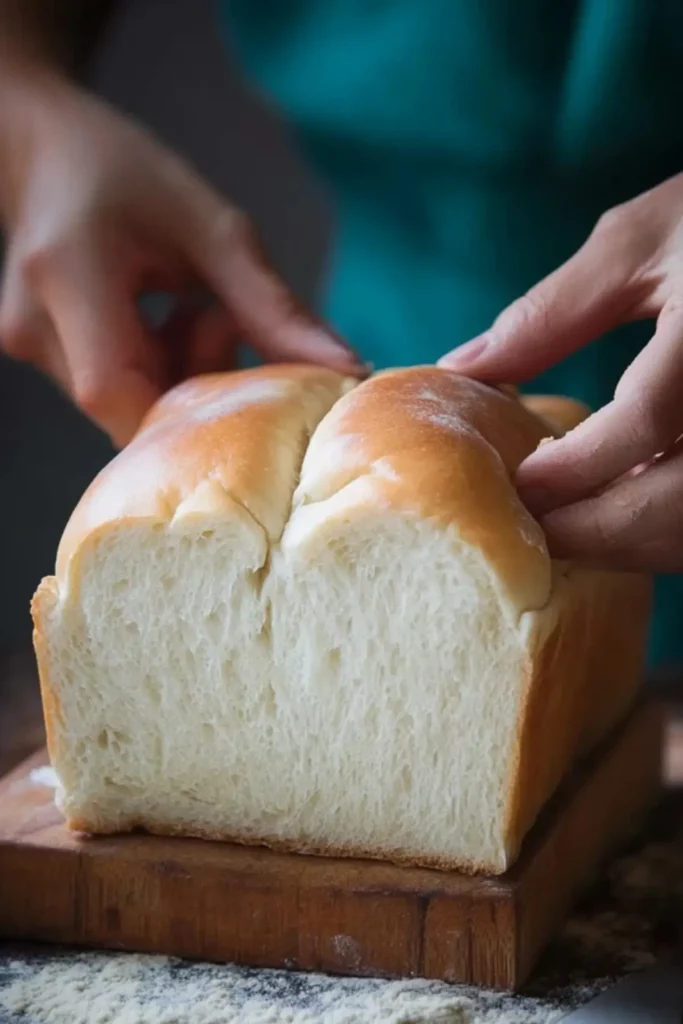
If you’re just beginning your home baking journey, this Soft Fluffy Hainanese Bread Loaf is the perfect starting point. It requires only a few basic ingredients, no complex techniques, and yields a comforting, old-school loaf that works beautifully as a breakfast staple or snack. It’s soft, tall, and versatile—everything a good loaf should be. And best of all, it’s healthier than many store-bought breads, with no preservatives and less sugar.

Why This Recipe is Special
This loaf is not your average white bread. Inspired by the classic Hailam Kopitiam bread served in old Malaysian and Singaporean coffee shops, Hainanese bread is traditionally sliced thick, toasted, and topped with kaya and butter. Its signature softness comes from a high-hydration dough and a slow proofing process, resulting in a pillowy interior and a tender crust.
For beginners, this bread is a great confidence booster. It’s forgiving, uses pantry staples, and offers noticeable rewards with every attempt. Plus, once you master it, you’ll realize how satisfying it is to make your own bread at home—no fancy machines or obscure ingredients needed.
Ingredients and Preparation
Bread flour: Provides the structure and chewy texture. You can substitute with all-purpose flour, but the result may be slightly less fluffy.
Milk powder: Enhances the richness and gives the bread a tender crumb. You can omit it or use a splash of evaporated milk instead.
Granulated sugar: Adds a subtle sweetness that complements the savory kaya toast pairing. Feel free to adjust based on preference.
Instant yeast: The leavening agent that makes the bread rise. Active dry yeast works too, but activate it in warm water first.
Salt: Balances the flavors and strengthens the dough structure.
Cold water: Hydrates the dough and contributes to the softness. Room temperature water can be used if you’re not proofing in a warm kitchen.
Butter (unsalted): Adds flavor and tenderness. Vegan bakers can swap it with margarine or coconut oil.
These simple components come together to create a loaf that’s soft, flavorful, and nostalgic.
Step-by-Step Instructions
Step 1 Begin by combining the bread flour, milk powder, sugar, yeast, salt, and cold water in the bowl of a stand mixer or a large mixing bowl if kneading by hand. Mix until the dough comes together, forming a rough mass.
Step 2 Once the dough is roughly combined, add in the softened butter. Continue kneading on medium speed for about 10 minutes (or up to 15 minutes by hand), until the dough becomes smooth, elastic, and stretchy enough to pass the “windowpane test”—when a thin stretch doesn’t tear.
Step 3 Lightly oil your hands and shape the dough into a ball. Place it into a greased bowl, cover with a damp cloth or plastic wrap, and let it proof in a warm spot until it doubles in size. This typically takes around 60–90 minutes depending on room temperature.
Step 4 Once risen, transfer the dough to a floured surface and press it gently to deflate. Divide into three or four equal portions and let them rest for 10 minutes covered to relax the gluten, which makes shaping easier.
Step 5 Roll each dough ball into a rectangle, fold the sides inward, and roll it up like a Swiss roll. This shaping method helps build structure. Place the shaped doughs side-by-side in a greased or parchment-lined loaf pan.
Step 6 Let the doughs rise again until they reach near the top edge of the pan, about 45–60 minutes. Preheat your oven to 350°F (180°C) near the end of this second proofing time.
Step 7 Bake the loaf in the middle rack of your oven for about 50 minutes, or until the top is golden and the internal temperature reaches 190°F (88°C). If the top browns too quickly, cover loosely with foil halfway through.
Step 8 Remove the loaf from the oven and carefully transfer it to a cooling rack. Let it cool completely before slicing to avoid a gummy interior.
Beginner Tips and Notes
- Dough too sticky? Lightly flour your hands or use a dough scraper. Avoid adding too much flour, or the bread will be dense.
- No stand mixer? Kneading by hand is totally doable. It just takes patience and steady folding.
- Bread not rising? Make sure your yeast is fresh. A cold kitchen may slow proofing, so use a slightly warm oven (turned off) as a proofing chamber.
- No loaf pan? You can shape the dough into a boule and bake it free-form on a baking tray.
- Overproofed dough? If your dough becomes very loose and bubbly, gently punch it down and reshape for a shorter second rise.
Serving Suggestions
For an authentic touch, slice your Hainanese bread thick and toast it over a grill or pan. Spread with kaya (coconut jam) and butter, and serve alongside soft-boiled eggs and milk tea for a full kopitiam experience.
You can also pair it with:
- Peanut butter and banana for a hearty snack
- Savory spreads like garlic herb butter or cheese
- French toast—its texture holds up beautifully when soaked and fried
Storage Tip: Wrap the fully cooled loaf in plastic wrap or store in an airtight container at room temperature for up to three days. For longer storage, slice and freeze with parchment between slices.
Conclusion
This easy sheet pan dinner—wait, let’s call it what it is: a bread lover’s starter dream—is a satisfying introduction to the world of home baking. This Soft Fluffy Hainanese Bread Loaf wait, scratch that—this soft and fluffy Hainanese bread loaf is not just beginner-friendly, it’s heartwarming. Whether you’re after quick and healthy meals or just looking to recreate nostalgic café-style breakfasts, this loaf will become a staple in your kitchen.
Give it a try, and let us know how it turns out! Leave your questions, tips, or success stories in the comments—we’d love to hear from you.
FAQ About Soft Fluffy Hainanese Bread Loaf
Q1: Can I make this Hainanese bread without a stand mixer?
Yes, you can knead the dough by hand. It will take about 15–20 minutes of steady kneading to achieve the same elasticity. Use the windowpane test to check if it’s ready.
Q2: What can I use instead of milk powder?
You can substitute milk powder with a tablespoon of evaporated milk or regular milk (adjust water accordingly), or omit it altogether. It adds richness but isn’t essential.
Q3: How do I know if my dough is properly proofed?
During the first proof, the dough should double in size. For the second proof, it should rise close to the rim of your loaf pan. A gentle poke test can also help—if the indentation springs back slowly, it’s ready.
More Relevant Recipes
Print
Soft Fluffy Hainanese Bread Loaf
- Total Time: 3 hours 8 minutes
- Yield: 1 loaf (450g pan), about 10–12 slices 1x
- Diet: Vegetarian
Description
Learn how to make a soft and fluffy Hainanese bread loaf—perfect for kaya toast or breakfast. Beginner-friendly and made with simple ingredients.
Ingredients
- 350g bread flour
- 15g milk powder
- 10g granulated sugar
- 1 tsp instant yeast
- 1/4 tsp salt
- 225ml cold water
- 30g unsalted butter, softened
Instructions
- Combine bread flour, milk powder, sugar, yeast, salt, and cold water in a mixing bowl. Mix into a rough dough.
- Add softened butter and knead on medium speed for about 10 minutes or until smooth and elastic (windowpane stage).
- Lightly oil your hands, shape the dough into a ball, place in a greased bowl, and cover. Let it proof until doubled in size (about 1–1.5 hours).
- Transfer to a floured surface, press to deflate, divide into 3–4 equal pieces, and rest covered for 10 minutes.
- Roll each piece into a rectangle, fold sides in, and roll up Swiss roll-style. Place into a lined loaf pan.
- Cover loosely and proof again until the dough reaches near the rim of the pan (about 45–60 minutes).
- Preheat oven to 350°F (180°C). Bake for 50 minutes or until the internal temperature is 190°F (88°C).
- Remove from oven and transfer loaf to a cooling rack. Let cool completely before slicing.
Notes
- If dough is sticky, flour hands lightly or use a scraper.
- Kneading by hand is possible but takes more time and effort.
- Make sure yeast is fresh for proper rising.
- Omit milk powder if necessary or replace with a bit of evaporated milk.
- Store cooled loaf in airtight container for up to 3 days or freeze for longer.
- Prep Time: 18 minutes
- Cook Time: 50 minutes
- Category: Bread
- Method: Baking
- Cuisine: Southeast Asian
Nutrition
- Serving Size: 1 slice
- Calories: 136
- Sugar: 1g
- Sodium: 73mg
- Fat: 3g
- Saturated Fat: 2g
- Unsaturated Fat: 2g
- Trans Fat: 1g
- Carbohydrates: 23g
- Fiber: 1g
- Protein: 4g
- Cholesterol: 7mg