Growing up, one of the best parts of summer was chasing down the ice cream truck for a Strawberry Shortcake bar. That first bite—cool, creamy, and strawberry-sweet—was a highlight of childhood. This Strawberry Crunch Cheesecake brings all of that nostalgic joy to your kitchen, with a modern twist that’s incredibly beginner-friendly.
The beauty of this recipe lies in its no-bake simplicity. No oven, no water baths, no complicated techniques. Just creamy layers, crunchy cookie crumbles, and vibrant strawberry flavor. Whether you’re new to baking or just short on time, this dessert is perfect for impressing guests or treating yourself to something special. And yes—it tastes as fun as it looks!

Why This Recipe is Special
- It’s completely no-bake, ideal for warm weather or tiny kitchens.
- Captures the flavor of childhood strawberry ice cream bars.
- Beginner-friendly steps that don’t require fancy tools or techniques.
- Creamy, crunchy, and fruity layers make for an indulgent but balanced dessert.
- Great for parties, potlucks, or simply enjoying a nostalgic treat at home.
Ingredients and Preparation
Vanilla Cream Cookies: The base of the crust and part of the topping. These cookies provide a buttery, crumbly texture that pairs beautifully with the creamy filling.
Butter: Helps bind the crust together and adds rich flavor.
Strawberry Gelatin: Brings the signature fruity flavor and gives the strawberry layer its iconic pink hue.
Boiling Water: Used to dissolve the gelatin properly.
Cream Cheese: The heart of the cheesecake layer—rich, creamy, and mildly tangy.
Granulated Sugar: Adds sweetness and balances the tanginess of the cream cheese.
Heavy Whipping Cream: When whipped, it adds air and lightness to the filling, creating that fluffy, mousse-like texture.
Powdered Sugar: Stabilizes the whipped cream and enhances sweetness.
Strawberry Wafer Cookies: Add crunch and more strawberry flavor to the topping.
Whipped Topping: Optional, but it adds a decorative and creamy finish on top.
Ingredient Swaps and Suggestions
- You can use Golden Oreos instead of vanilla cream cookies.
- Strawberry jam can be folded into the filling for a more natural flavor.
- Greek yogurt can replace part of the cream cheese for a tangier, lighter version.
- Use vegan cream cheese and coconut cream to make a dairy-free version.
Step-by-Step Instructions
Step 1: Crush about 26 vanilla cream cookies in a food processor until finely ground, then mix in the melted butter until the texture resembles wet sand. Press this mixture evenly into a greased 10-inch springform pan and freeze for 15 minutes to set the crust.
Step 2: In a bowl, combine boiling water and strawberry gelatin. Stir for about 2 minutes until fully dissolved and set aside to cool (don’t refrigerate).
Step 3: In a separate bowl, beat softened cream cheese with granulated sugar until smooth and lump-free. Set aside.
Step 4: In another mixing bowl, whip the heavy cream with powdered sugar until stiff peaks form. This should take about 3-4 minutes with an electric mixer.
Step 5: Divide the whipped cream mixture in half. Mix one half with the cream cheese mixture and the other half with the gelatin mixture. Make sure both mixtures are smooth and evenly combined.
Step 6: Pour half of the strawberry gelatin mixture over the chilled crust and freeze for 15 minutes to firm up.
Step 7: Remove the pan from the freezer and carefully layer on the cream cheese mixture. Then top it with the remaining strawberry gelatin mixture.
Step 8: Crush the remaining vanilla cookies and strawberry wafers using a rolling pin or food processor. If desired, add a few drops of red or pink food coloring for extra visual appeal. Mix the crushed cookies together and sprinkle generously over the top of the cheesecake.
Step 9: Refrigerate the cheesecake for at least 4 hours or until fully set. Before serving, pipe whipped topping onto the top if you like an extra decorative finish.
Beginner Tips and Notes
- Whipped Cream Tip: For best results, chill your bowl and beaters before whipping the cream—it helps it thicken faster.
- Too Runny? Make sure the gelatin mixture is cooled but not watery; if too hot, it may break down the cream.
- Crust Crumbling? Press the crust down firmly with the bottom of a glass to ensure it holds together.
- Overmixed Cream? Stop whipping as soon as stiff peaks form to avoid a grainy texture.
- Topping Too Dry? Mix a bit of melted butter into the cookie crumble if it doesn’t stick together well.
Serving Suggestions
- Serve slices with a scoop of vanilla ice cream for an extra indulgent treat.
- Drizzle with strawberry sauce or add fresh strawberries for a fruity finish.
- Leftovers should be covered and stored in the fridge for up to 4 days.
- This cheesecake can also be frozen in individual slices—wrap each tightly and thaw in the fridge overnight.
Engagement Features
I’d love for you to give this strawberry crunch cheesecake a try. It’s the perfect blend of fun and flavor, ideal for anyone who wants to create a no-fail, crowd-pleasing dessert. If you make it, let me know how it turns out in the comments. Share your twists, your memories, or your favorite nostalgic desserts—I’d love to hear your story.
FAQ About Strawberry Crunch Cheesecake
Can I make this cheesecake ahead of time?
Absolutely! This cheesecake is perfect for preparing a day in advance. In fact, chilling it overnight helps the layers set better and enhances the flavor.
Do I need a springform pan for this recipe?
A springform pan is recommended for easy release and clean presentation, but you can use a deep pie dish or a square baking pan lined with parchment paper if needed.
Can I use frozen strawberries instead of strawberry gelatin?
This recipe specifically uses strawberry gelatin to help the no-bake filling set properly. Using frozen strawberries alone won’t provide the same texture, but you can fold in a few chopped frozen strawberries for added texture and flavor.
More Relevant Recipes
- Mini No-Bake Oreo Cheesecakes
- Strawberry Honey Custard Tarts with Lemon Curd
- Strawberry Chocolate Cake
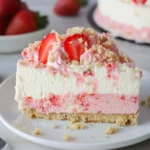
Strawberry Crunch Cheesecake
- Total Time: 4 hours 30 minutes (includes chill time)
- Yield: 12 servings 1x
- Diet: Vegetarian
Description
Strawberry Crunch Cheesecake is a nostalgic, no-bake dessert inspired by the classic strawberry shortcake ice cream bars. With creamy cheesecake layers, fruity strawberry gelatin, and a buttery cookie crumble topping, this crowd-pleasing treat is as fun to make as it is to eat. Perfect for summer gatherings, birthdays, or a sweet weekend indulgence.
Ingredients
Crust:
- 1 lb vanilla cream cookies (about 34 cookies, divided)
- 6 tablespoons butter, melted
Filling:
- 1 small box (3.3 oz) strawberry gelatin
- 1 cup boiling water
- 2 bricks (8 oz each) cream cheese, softened
- ¾ cup granulated sugar
- 2 cups heavy whipping cream
- ½ cup powdered sugar
- 10 strawberry wafer cookies (about 4 oz)
Topping:
- ½ small tub whipped topping (thawed), optional
- Food coloring (optional)
Instructions
- Make the crust: Crush 26 vanilla cream cookies in a food processor until they resemble fine crumbs. Add melted butter and pulse until the texture is like wet sand. Press the mixture evenly into the bottom of a greased 10-inch springform pan, pressing firmly. Freeze for 15 minutes to help it set.
- Prepare the gelatin mixture: Stir the boiling water into the strawberry gelatin in a bowl. Mix thoroughly for 2 minutes until fully dissolved, then set aside to cool to room temperature. Avoid refrigerating it.
- Mix the cheesecake base: In another bowl, beat the softened cream cheese and granulated sugar until smooth and creamy. This creates the tangy, rich foundation of your cheesecake layer.
- Whip the cream: In a separate bowl, beat the heavy whipping cream and powdered sugar until stiff peaks form. A hand or stand mixer works best, and it helps if the bowl and beaters are chilled in advance.
- Divide and combine: Split the whipped cream into two equal portions. Gently fold one half into the cream cheese mixture, and the other half into the cooled gelatin mixture. This gives you two flavored fillings—one creamy and one fruity.
- Layer the cheesecake: Pour half of the strawberry gelatin mixture over the chilled crust and spread evenly. Freeze for 15 minutes to set. Then spread the cream cheese mixture on top, followed by the remaining strawberry gelatin mixture. Smooth the top with a spatula.
- Add the crunch topping: Coarsely crush the remaining vanilla cream cookies and the strawberry wafers. You can use a tart shaper, food processor, or a rolling pin with a sealed bag. If desired, mix in a few drops of red or pink food coloring for a vibrant touch. Sprinkle the cookie mixture generously over the cheesecake.
- Chill the cheesecake: Refrigerate the entire cheesecake for at least 4 hours, or overnight, until firm and sliceable. Before serving, add whipped topping using a pastry bag fitted with a star tip for a decorative finish, if desired.
Notes
- Golden Oreos work well as a substitute for vanilla cream cookies.
To store, cover with plastic wrap or store in an airtight container in the refrigerator for up to 4 days. - For a playful twist, scoop some of the cheesecake into waffle cones for a fun summer treat.
- If the topping doesn’t stick well, mixing it with a touch of melted butter helps it bind.
- Prep Time: 30 minutes
- Cook Time: 0 minutes
- Category: Dessert
- Method: No-Bake
- Cuisine: American
Nutrition
- Serving Size: 1 slice
- Calories: 919
- Sugar: 56g
- Sodium: 580mg
- Fat: 58g
- Saturated Fat: 29g
- Unsaturated Fat: 24g
- Trans Fat: 1g
- Carbohydrates: 93g
- Fiber: 2g
- Protein: 11g
- Cholesterol: 127mg